Chat User Guide
Interface Components
The AI DIAL Chat application interface has several sections, such as the chat box, settings, and panels for managing conversations and saved prompts.
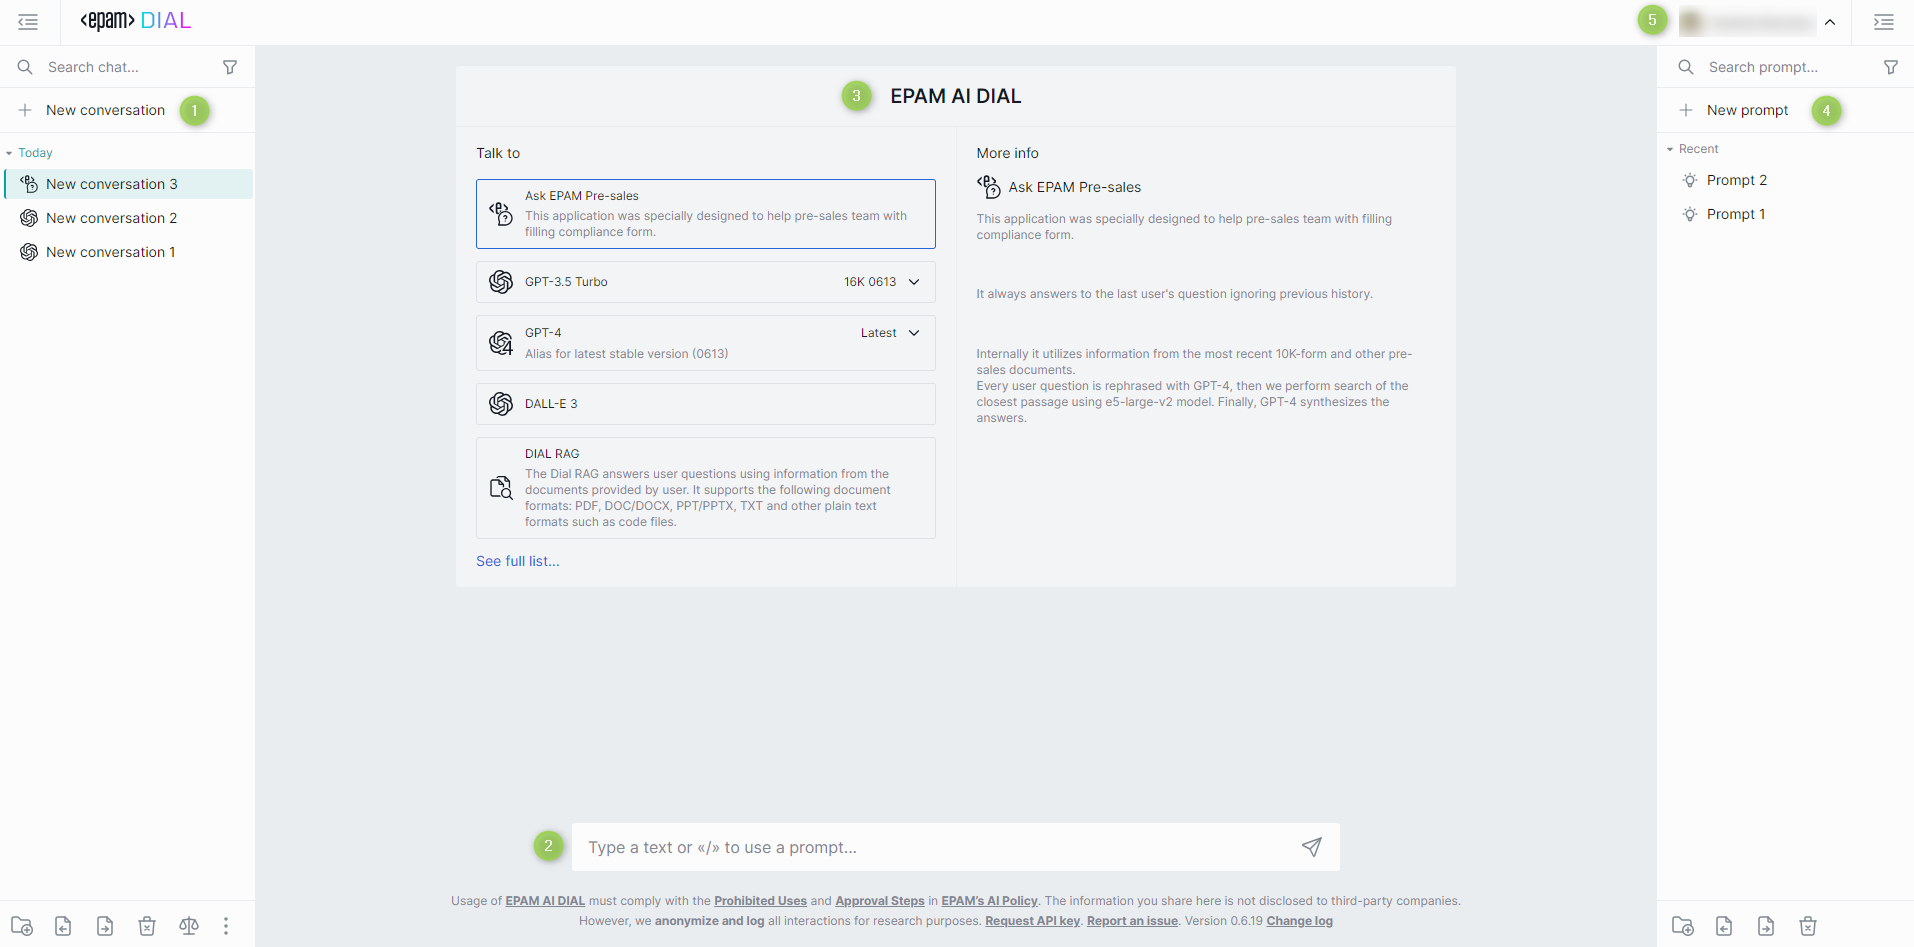
- Conversations: Here, you can manage your conversations: create new ones, organize them in folders, and delete. You can collapse and expand the panel by clicking the Hide panel icon above it.
- Chat: Use this section to enter a prompt, view results, and interact with language models.
- Chat Settings: In this section, you can select the language model, assistant, application, and addons you'd like to use. You can also provide a system prompt and adjust the temperature setting.
- Prompts: In this section, you can work with saved prompts: create new templates, update them, and organize them in folders. You can collapse and expand the panel by clicking the Hide panel icon above it.
- User Settings: In your user settings, you can customize the color theme (dark or light), choose a custom logo and other customization options.
Conversations
In the AI DIAL framework, a conversation is a dialogue between an agent, such as a language model, assistant, or application, and a human user. The agent uses natural language to interact with a human and receive/give a feedback. Within one conversation, you can refer to previous questions and answers. But different conversations don’t share context.
All your conversations are stored on the server, and you can access them from any device you use.
Actions
During a conversation, you can perform various actions:
- Enter prompt: you can use a text box at the bottom to enter your prompts.
- Generate answer: click enter to generate the response to your prompt.
- Stop generating: in the process of generating the response, you can stop it.
- Regenerate response: when stopped, you can regenerate the response. Important: If you encounter a server error or click the Stop Generating button and receive an empty response, the Send button will be disabled. To continue the conversation, you'll need to generate the answer again. If you receive a partial response (a combination of text and an error), the model can still proceed, while for Assistants/Applications, you'll need to generate the response again.
- Delete/Edit: during the conversation, you can edit or delete your prompts. After a prompt has been edited, the response is regenerated, and all your prompts after the edited one will be deleted. When you delete your prompt, the response will be deleted, too.
- Attach files: some models and applications (e.g. DIAL RAG) support adding attachments (files, links, folders) to conversations. In this case, you'll see the Attachments icon available in the chat box. Click it to upload a file from your device or select an already uploaded file. Refer to the Manage attachments section for details.
- Download attached files: click the Download icon near the file name.
- Preview attached images: click the Expand icon near the image name.
- Copy: you can copy answers.
- Like/dislike: you can like and dislike responses in a conversation. Use likes to highlight important responses and dislikes to mark the responses you don't need.
- Clear conversation messages: you can clear all messages in your conversation. Click the eraser icon on the top bar to do that.
- Change conversation settings: during the conversation, you can access and edit its setting by clicking the gear icon on the top bar. Refer to Chat Settings to learn more.
- View current settings: on the top bar, point to the language model logo icon near the conversation name to see current settings.
Arrange
You can gather your conversations in folders.
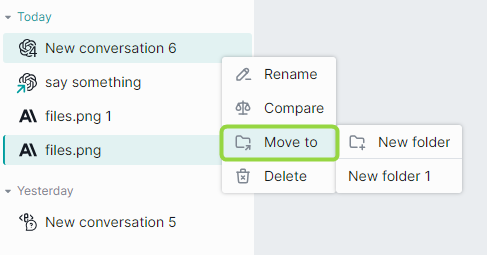
You can create a hierarchy of folders with three nesting levels. Just create a folder and drag-n-drop it in the other folder to create a nesting level. The same way, you can either drag-n-drop a conversation into a folder or use Move to in the context menu of a conversation to move it to a folder. Empty folders are deleted after refreshing a page.
The following symbols in the folders names are prohibited: tab, ", :, ;, /, \, ,, =, {, }, %, & and will be excluded. Note that you can use the . symbol at the start or inside a name, but the dot at the end will be automatically removed.
The MAX length of the folder name is limited to 160 symbols. Everything beyond is cut off.
When you use the contextual menu to move a conversation, you can create a new folder, in which the conversation should be moved.
Search and Filter
The Search box can be utilized to find conversations and folders by their names.

You can filter conversations by the "Shared by me" criterion. To do so, click the Filter icon and select Shared by me.
Create
To create a conversation:
- On the left panel, click New conversation.
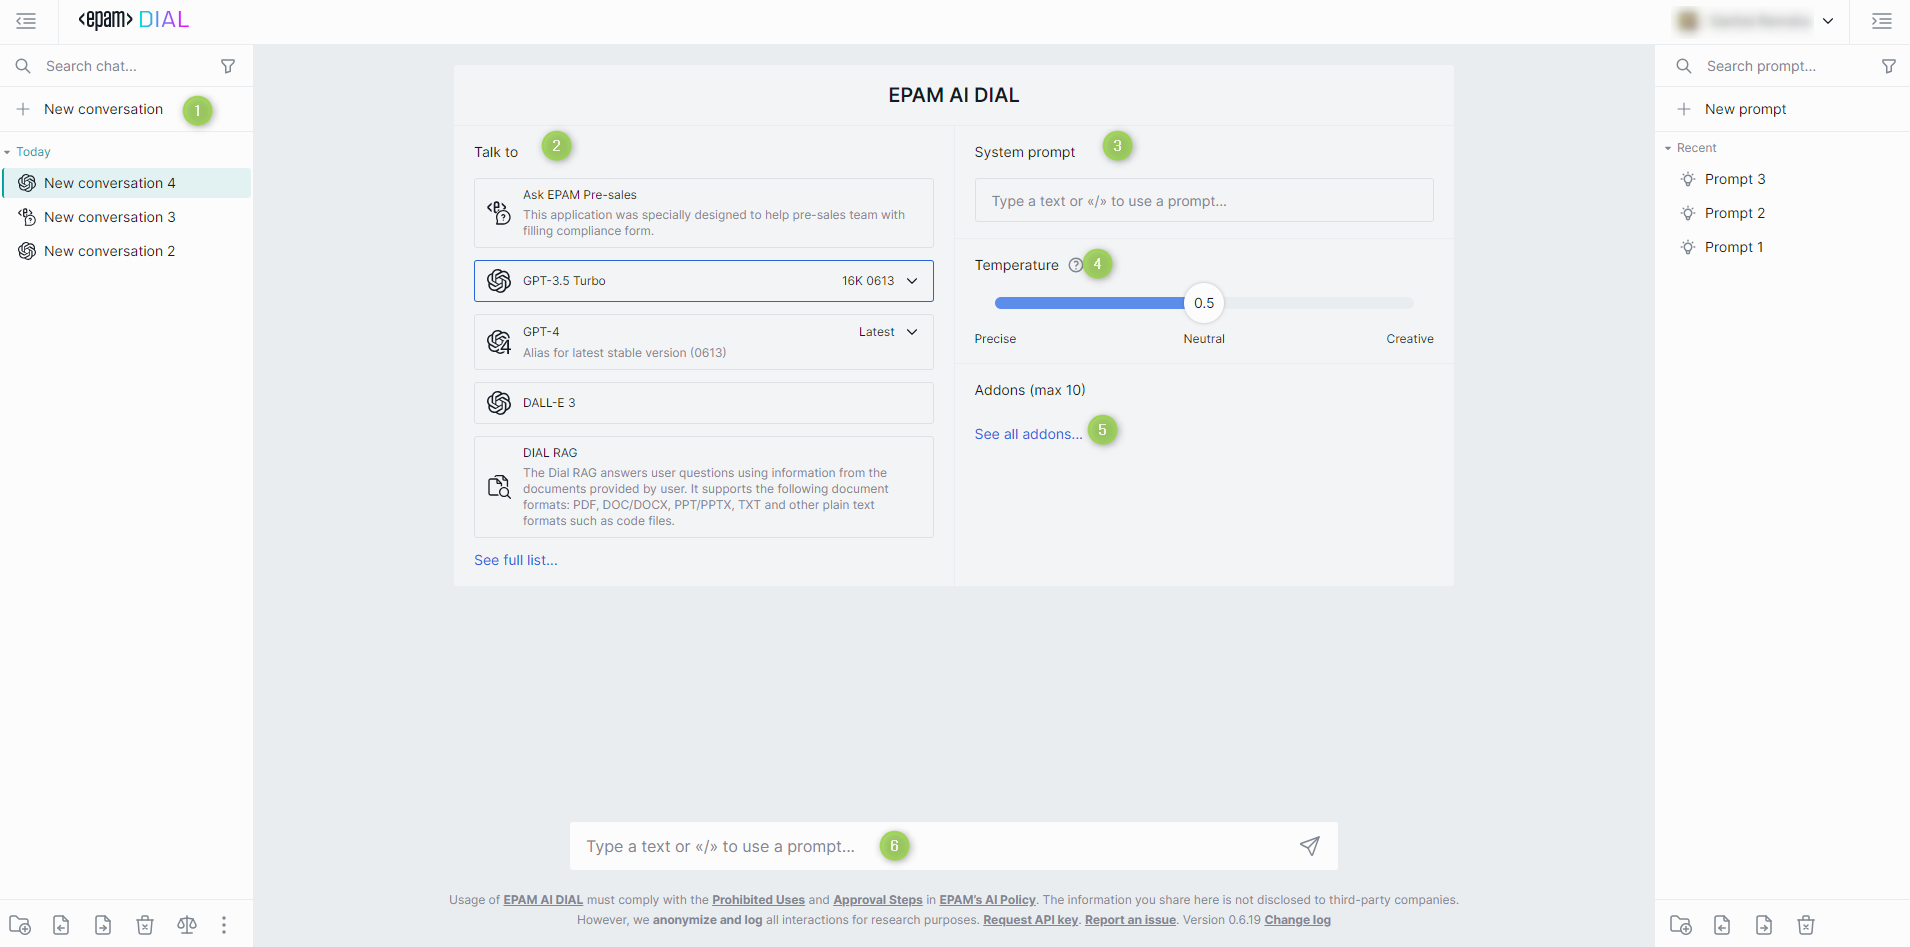
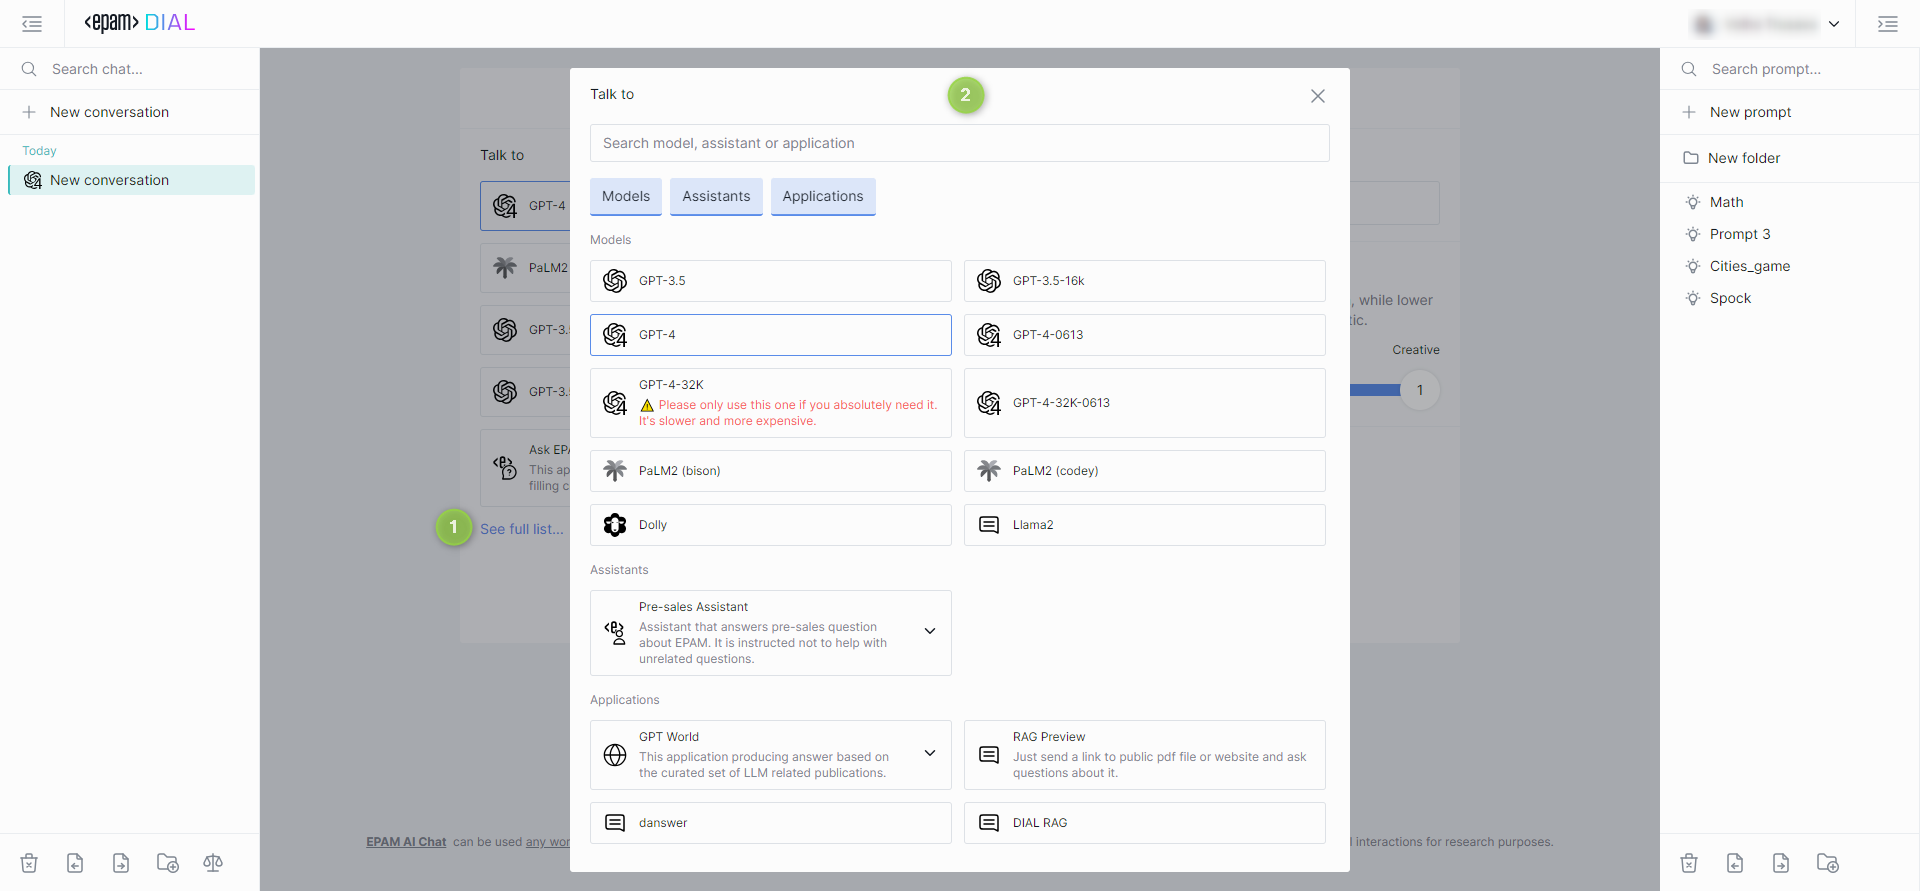
- In the main section, under Talk To, select a language model, an assistant, or an application. Five most recently used items are shown in the section. To see all available items, click See full list.
- Optionally, under System prompts, select a prompt by typing "/" in the text box. For details, refer to the Prompts section of this guide.
- Under Temperature, set a value of the temperature parameter. For details, refer to the Temperature section of this guide.
- Optionally, under Addons, select an Addon. For details, refer to the Addons section of this guide.
- Under conversation settings, type your text (prompt) in the chat box and click the Send icon. The conversation will be created, and your first question will be used as its name.
The following symbols in the conversation names are prohibited: tab,
",:,;,/,\,,,=,{,},%,&and will be excluded. Note that you can use the.symbol at the start or inside a name, but the dot at the end will be automatically removed. The MAX length of the conversation name is limited to 160 symbols. Everything beyond is cut off.
Conversation Settings
In the conversation header, you can view the current settings, change settings (including model, temperature, prompt and more or clear the conversation history to start from scratch:

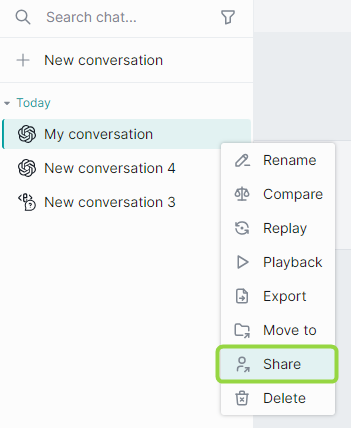
Share
You can share a conversation or a folder with several conversations with other users.
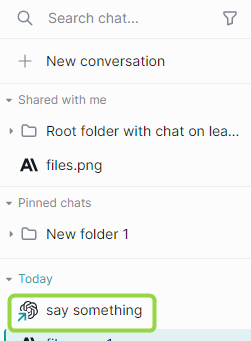
When someone shared a conversation with you, you can find it in the Shared with me section on the left panel. Important: you cannot change a conversation that has been shared with you. To be able to work with it, duplicate it.
To share a conversation or a folder, click Share in the contextual menu and copy the link. After someone has opened your link, an arrow icon appears near its name and this conversation can be found when Shared by me checkbox is selected in the Search menu.
When you share a folder, all folders and conversations in this folders will be shared.
Unshare
To revoke access from all users, click Unshare in the contextual menu and then confirm action in the dialog window.

Duplicate
You can duplicate a conversation, for example, to be able to change a conversation that was shared with you. To duplicate a conversation, click Duplicate in the contextual menu.
This feature is available only for conversations shared with you.

Export
You can export selected conversations with or without attachments or all conversations without attachments in a JSON format.
Exported conversations are named by the following pattern: prefix "epam_ai_dial_chat", then "with_attachments" if the conversation was exported with attachments, then "month_day". However, the naming convention is configurable in the chat config.
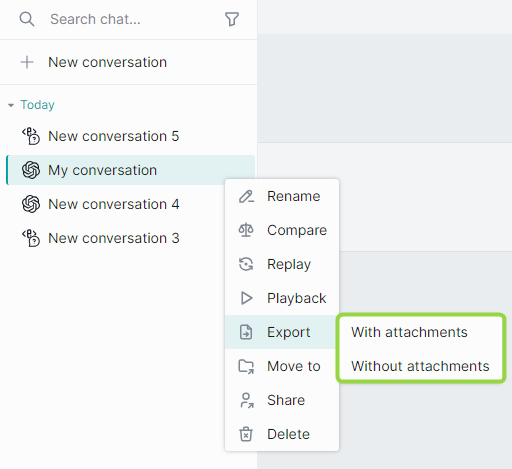
Export a single conversation with attachments
To export a single conversation:
- On the left panel, in the conversation contextual menu, point to Export.
- Click With attachments.
The conversation will be exported as a ZIP archive.
Export a single conversation without attachments
To export a single conversation:
- On the left panel, in the conversation contextual menu, point to Export.
- Click Without attachments.
The conversation will be exported as a JSON file.
Export all conversations
To export all conversations, at the bottom of the left panel, click the Export conversations icon.
Conversations will be exported without attachments.

Import
Exported conversations can be imported.
To import JSON or a zip file with conversations, click the Import conversations icon at the bottom of the left panel and then select a file with conversations.
When you import a conversation with attachments, the attachments will be available in the Imports folder.

Note, that when importing a duplicate of an existing conversation, you will be prompted to select one of the proceeding options: replace, ignore or add a prefix to the imported conversation. If the imported conversation includes attachments, you will be prompted to make the same selection for them as well.

Delete
You can delete a single conversation or all conversations.
To delete a single conversation, on the left panel, in the conversation contextual menu, select Delete and confirm your action.

To delete all conversations, at the bottom of the left panel, click the Delete conversations icon.
Replay
You can use Replay to reproduce conversations but with different settings (e.g. a different model). A replayed conversation can be used to compare responses to the same questions from different models and with different settings of the conversation.

Use Replay as is to reproduce the conversation with the original settings.

To replay a conversation:
- Click Replay in the conversation menu.
- Select Replay as is in More info in the Replay settings to reproduce the conversation with the original settings or change the conversation settings.
- Click Start replay.
- In the process of replaying, you can stop and resume the replay process.
The replayed conversation is displayed as a new conversation with the [Replay] tag in the list of your conversations.
Playback
The Playback mode can be used to simulate the current conversation without any engagement with models. This mode accurately reproduces the conversation like a recording. It should be noted that this differs from the Replay mode, where the prompts are resubmitted to the chosen model and the outcomes may differ from the initial conversation.
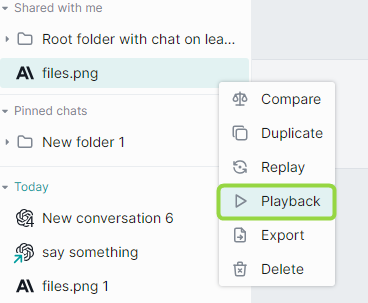
During the playback, you can move back and forward the playback process or stop it.
Compare
Use the Compare mode to compare two new (or two existing) conversations with different setting (e.g. different models or temperature).
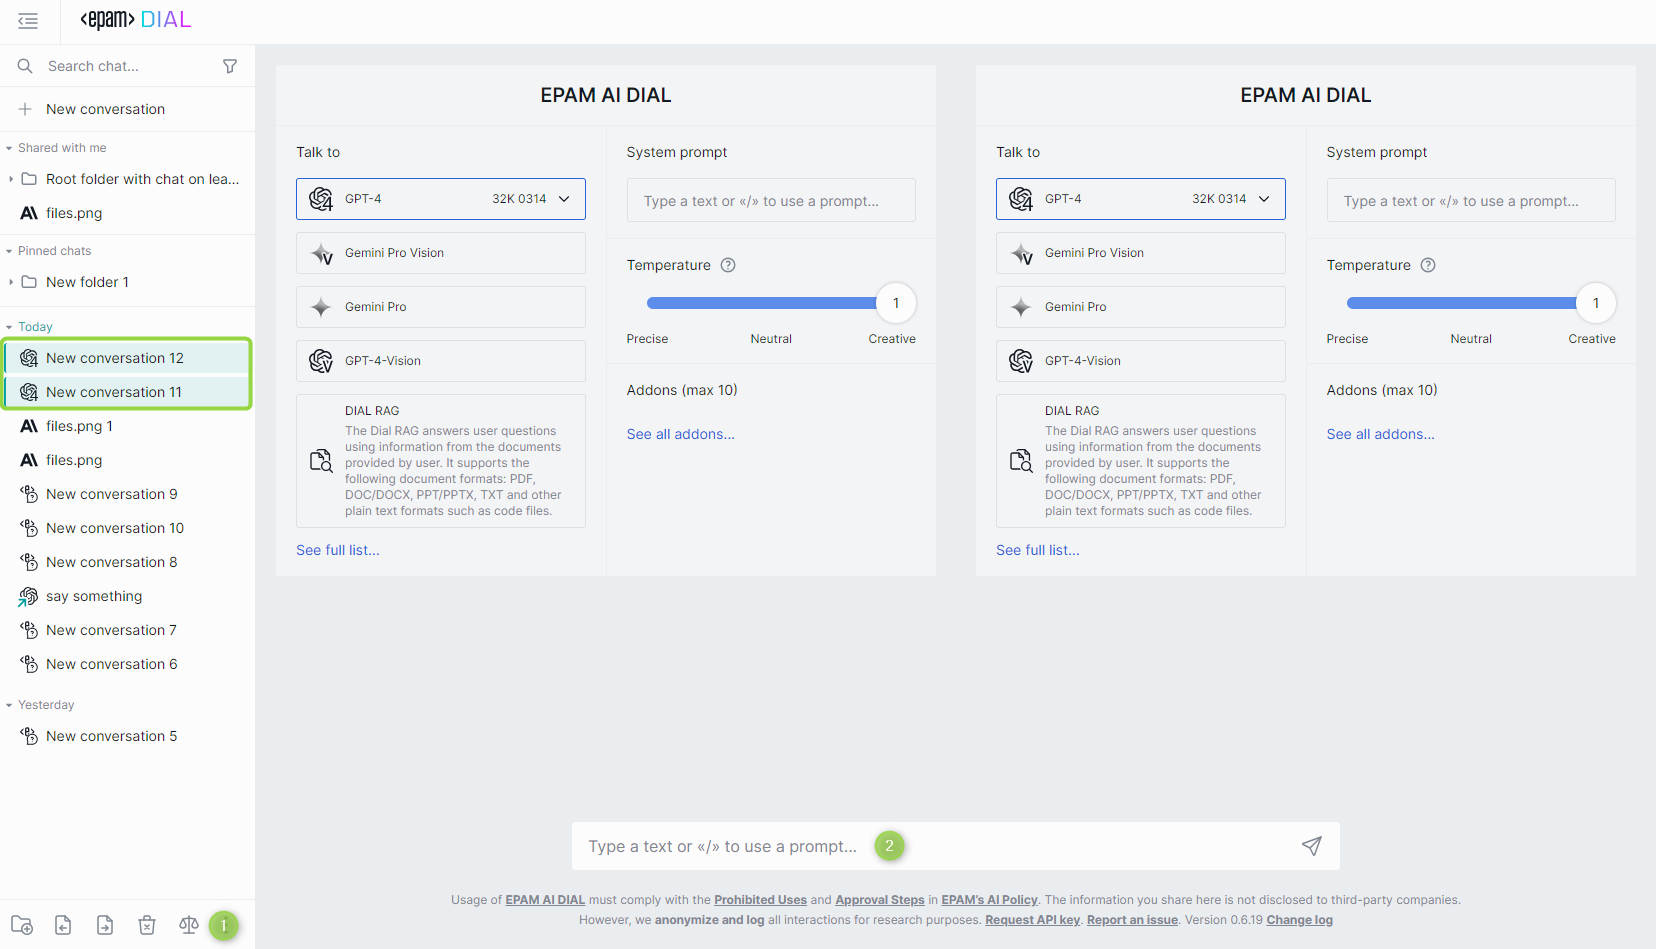
To compare two new conversations:
- Click the Compare icon at the bottom of the left panel.
- Choose settings of the first conversations.
- Choose settings of the second conversation.
- Type your question (prompt) in the chat box.
As you can see on the picture above, the system creates two conversations with the same name but adds numbers to them. If you have chosen different language models, the conversations icons on the left panel will differ.
You can also compare two existing conversations:
The Compare mode works only with conversations with the same amount of prompts from a user. The application will not allow comparing two conversations with different amounts of prompts.
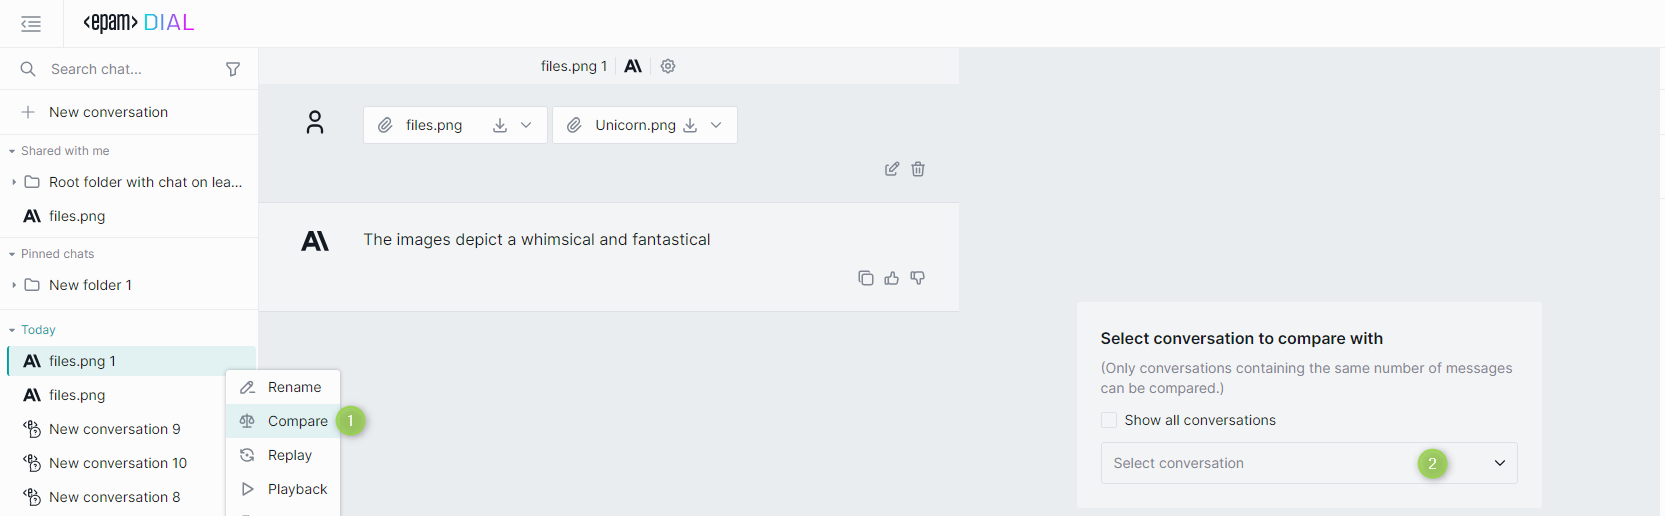
- On the left panel, in the conversation menu of a conversation, select Compare.
- In the main section, under Select conversation to compare with, select the second conversation from the drop box.
- By default, only conversations with the same name are available in the drop box. Select Show all conversations to see the full list of conversations.
- Type your question (prompt) in the chat box.
Attachments
AI DIAL applications (e.g. DIAL RAG) can support attaching files, links or folders to a conversation and generate responses considering the attached resources.

Folders
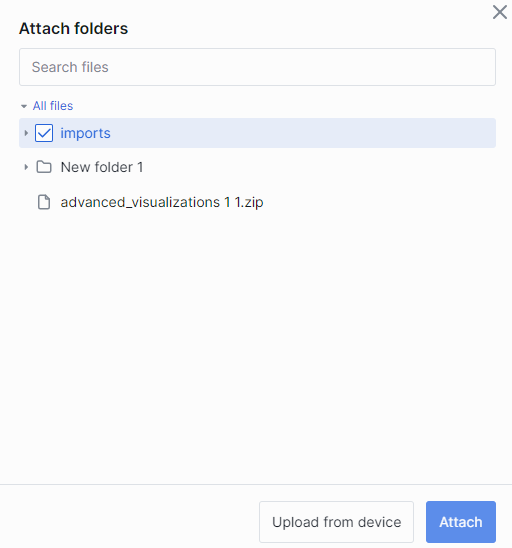
If the selected application supports this, you can click the attachment icon in the conversation box and select Attach folders.
Note, that you can attach only folders from the file manager and cannot upload folders from an external source.

In the pop-up window, select a checkbox for the folder you want to add to add it. The attached folder will appear in the conversation box and become available for the application to work with.
Links
If the selected application supports this, you can click the attachment icon in the conversation box and select Attach link. Then, specify a valid URL and click Attach. The link will be displayed as attachment in the conversation box and become available for the application to work with.

Files
If the selected application supports this, you can click the attachment icon in the conversation box and select Attach uploaded files. In the attachments manager, select available files that you have previously uploaded and select a checkbox to add to the conversation. The file will be displayed as attachment in the conversation box and become available for the application to work with.

Attachments Manager
All attached and uploaded files are available in the attachments manager. To manage all attachments, click the Attachments icon at the bottom of the left panel.

To Create a Folder:
You can create folders and then upload files into them. Note, the only way to add a file into a folder is to upload it - you cannot move files between folders.
AI DIAL applications can be configured to allow attaching entire folders to conversations. In this case, only folders created in the attachemnts manager can be attached to a conversation.

- Click a folder icon to create a new folder.
- Give your folder a name.
- Click submit to apply.
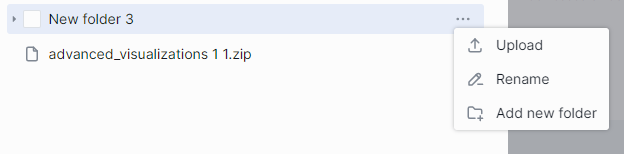
You can as well perform several actions on your folders:
- Rename
- Upload files
- Add subfolders
To Upload a File:
To add a file into a folder it is necessary to upload it.
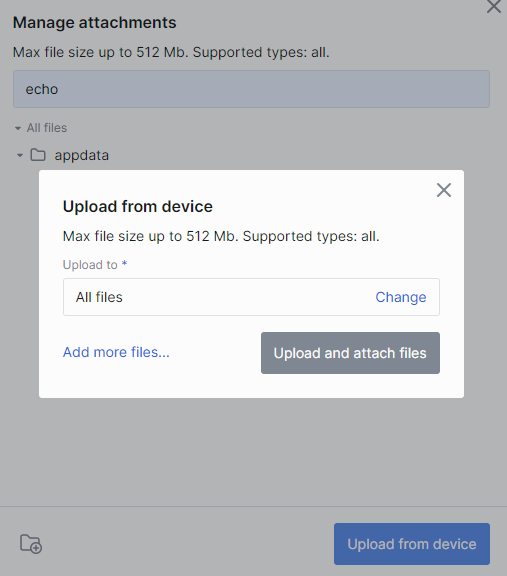
- In the Manage attachments dialog, select Upload from device.
- Select one or several files you want to upload and click Open.
- Under Upload to, select Change to pick a folder, in which the files will be uploaded.
- Under Files, change their names or delete them, if necessary. The following symbols in the file names are prohibited: tab,
",:,;,/,\,,,=,{,},%,&. Note that you can use the.symbol at the start or inside a name, but the dot at the end will be automatically removed. - Click Upload and attach files.
To Unshare a File:
Using the application that supports the attachments of files, you can create a conversation and share it with someone. When a conversation is shared, all the attached to the conversation files are shared as well. In the attachments manager, such shared files are tagged with a blue arrow:

In the file menu, you can choose to unshare it:

To Download Attachments:
Click a folder to expand it.
- In the Manage attachments dialog, point to a file and select it. You can select several files.
- Click the Download icon below the files tree.
To Delete Attachments:
You won't be able to preview or download a deleted file in a conversation, but you still will see its name.
- In the Manage attachments dialog, point to a file and select it. You can select several files.
- Click the Delete icon below the files tree.
Prompts
A prompt is an instruction, a question, or a message that a user provides to a language model to receive an answer. Prompts can also contain constraints or requirements. They help the model understand the task at hand and the types of responses that are expected. You can use prompts as templates for your messages, instructions to the model, or to encourage the model to generate specific types of content. In AI DIAL, you can create prompts beforehand and reuse them in one or several conversations.
Prompts can be applied to one message or a whole conversation. Refer to the System prompt section of this guide for details.
The section with your prompts is located in the right-hand area of the screen. In this section, you can work with saved prompts: create new templates, update them, and organize them with folders.
All your prompts are stored on the server, and you can access them from any device you use.
Actions

You can perform various actions with your prompts:
- Edit: select a prompt on the right panel to invoke the Edit window. Make all necessary changes and click Save.
- Export: right-click a prompt on the right panel and select Export. The prompt will be exported as JSON.
- Import: click the Import prompts icon at the bottom of the right panel and then select a JSON file with prompts.
- Move to: use to place a prompt in a folder.
- Delete: right-click a prompt on the right panel and select Delete, then confirm the action.
- Delete all prompts: click the Delete all icon at the bottom of the right panel and confirm your action.
- Export all prompts: click the Export prompts icon at the bottom of the right panel. All your prompts will be exported as JSON.
- Share: use to share a prompt or a folder with several prompts with other users.
- Unshare: use to revoke access to shared prompts.
Arrange
You can gather your prompts in folders.

You can create a hierarchy of folders with three nesting levels. Just create a folder and drag-n-drop it in the other folder to create a nesting level. The same way, you can either drag-n-drop a prompt into a folder or use Move to in the context menu of a prompt to place it in one of the folders.
After refreshing the page or logging in again, any empty folders will be deleted.
The following symbols in the folders names are prohibited: tab, ", :, ;, /, \, ,, =, {, }, %, &. Note that you can use the . symbol at the start or inside a name, but the dot at the end will be automatically removed. The MAX length of the folder name is limited to 160 symbols. Everything beyond is cut off.
Search and Filter
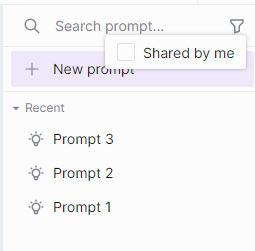
The Search box can be utilized to find prompts and folders by their names.
You can filter prompts by the "Shared by me" criterion. To do so, click the Filter icon and select Shared by me.
Create

To create a new prompt:
- On the right panel, select New prompt.
- Fill in the Name, Description, and Prompt boxes. The following symbols in the prompt names are prohibited: tab, ":", ";", "/", "", ",", "=", ", ", "%", "&". Note that you can use the "." symbol at the start or inside a name, but the dot at the end will be automatically removed. The MAX length of the prompt name is limited to 160 symbols. Everything beyond is cut off.
Please note that both the Name and Description fields are mandatory to fill in order to create a prompt!
- Click Save.
Name and Description aren’t used as instructions for a language model. They only help you to distinguish the prompt from others. The language model will only use instructions from the Prompt box.
Variables
You can use prompts as templates for your messages to a language model. For example, you need to calculate an equation a + c/d, round up the answer, and then divide it by 4. Let’s imagine that you need results for four sets of a, c, and d.
In that case you can create the following prompt:
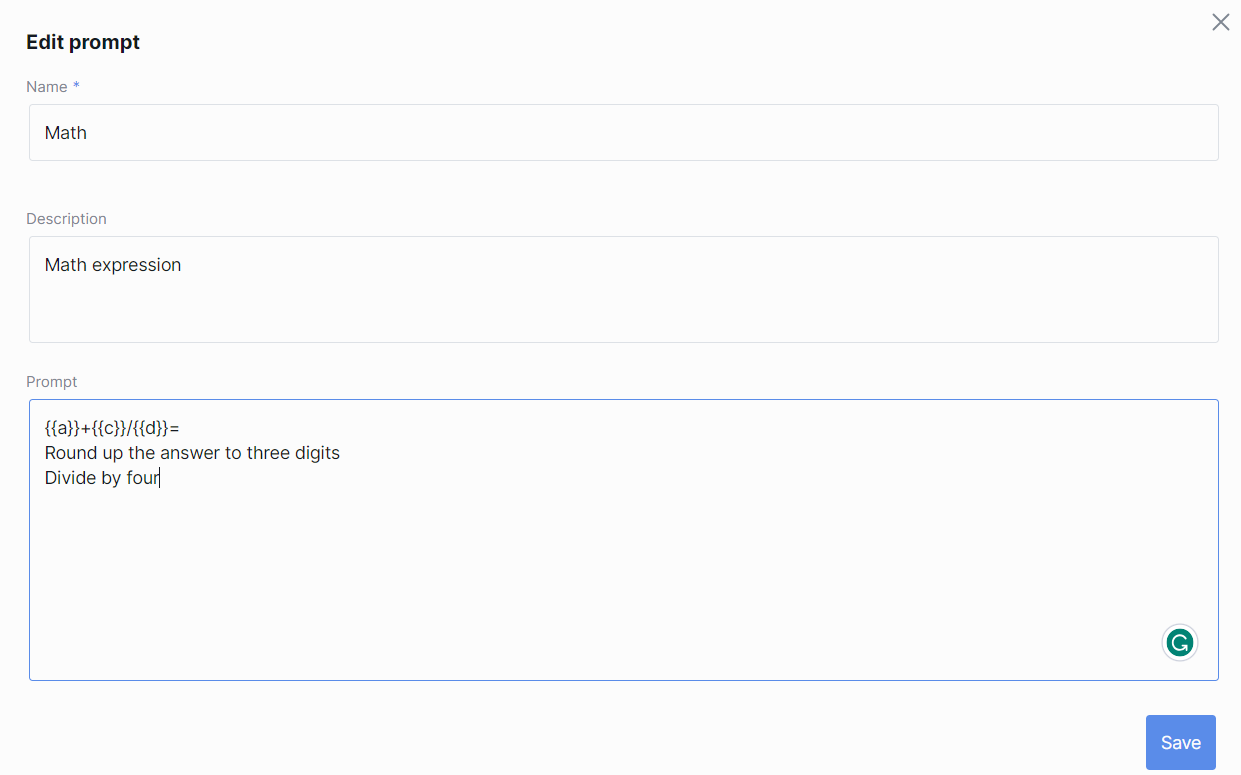
Here, a, c, and d are variables. In the prompt body, they are denoted by double curly brackets: {{ }}.
You can combine mathematical expressions and natural language in your prompts.
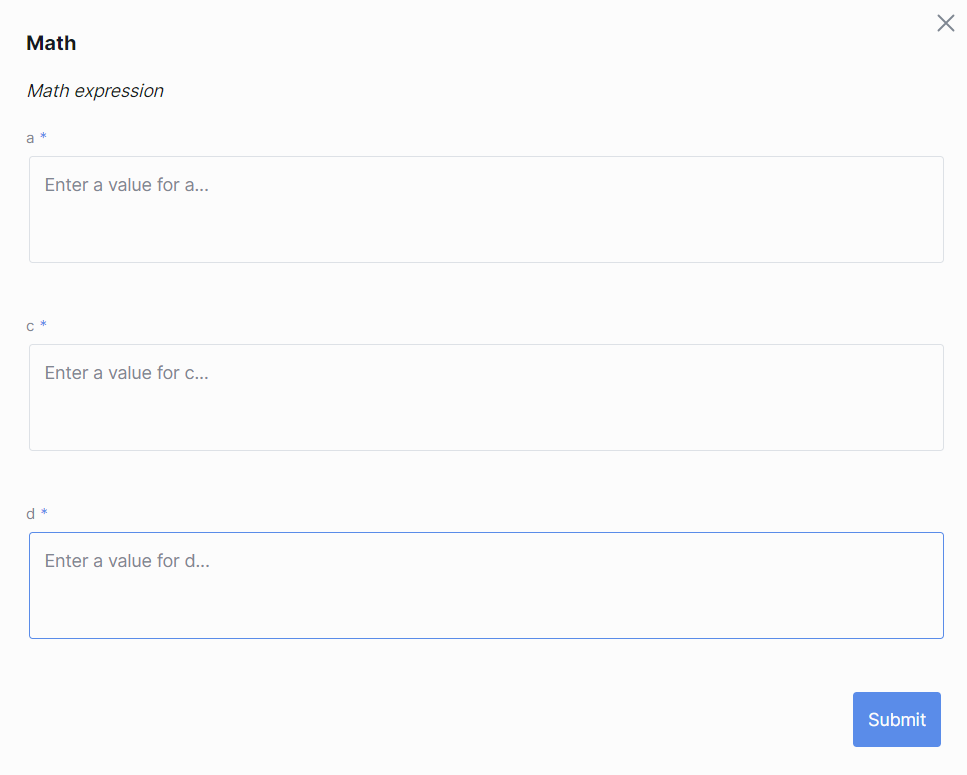
After you’ve created the prompt, you can use it by typing a slash / in the chat box and selecting the name of a prompt (it is Math in our example). You’ll see the following form where you can enter any numbers:
When you submit the form, your message will look like on the illustration below:

Send the message to the model, and it will generate an answer using both mathematical and natural language instructions:

Generally, variables can be anything, not only numbers. For example, you can create a prompt with the following body: Who played {{character}} in {{movie}}? or What is a Latin name of {{plant common name}}?
Share
You can share a prompt or a folder with several prompts with other users.
To Receive a Shared Prompt:
To obtain a prompt from someone else (receive a shared prompt), you must get a link from them. By clicking on this link, you will import the prompt into your chat.
When someone shares a prompt with you, you can find it in the Shared with me section on the right panel. Important: you cannot change a prompt that has been shared with you. To be able to work with it, duplicate it. When you receive a shared prompt, a pop-up window opens up, where you can preview a prompt and duplicate it if needed.
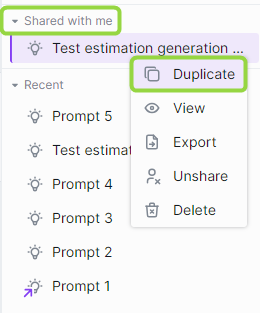
You can always view prompts that have been shared with you in a dedicated section and perform various actions on them such as
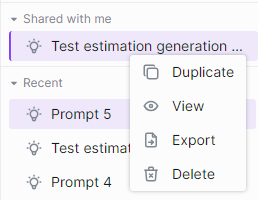
- View: opens a pop-up window with a prompt preview.
- Duplicate: use to duplicate a shared with you prompt to be able to modify it.
- Delete: remove from the list.
- Export: download in a JSON format.
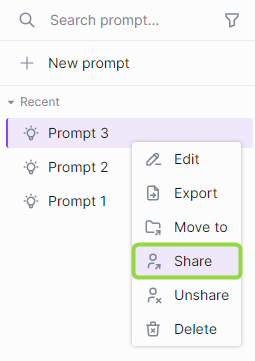
To Share a Prompt:
To share a prompt or a folder, click Share in the contextual menu and copy the link. After someone has opened your link, an arrow icon appears near its name and this prompt can be found when Shared by me checkbox is selected in the Search menu.
![]()
When you share a folder, all folders and prompts in this folders will be shared.
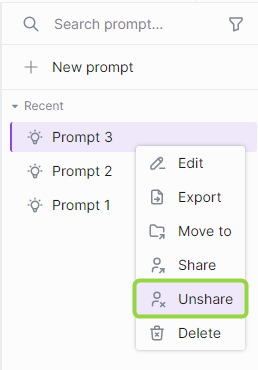
Unshare
To revoke access from all users, click Unshare in the contextual menu and then confirm actions in the dialog window.
Duplicate
You can duplicate a prompt, for example, to be able to change a prompt that was shared with you. To duplicate a prompt, click Duplicate in the contextual menu.
You can duplicate only prompt shared with you.
Export Import
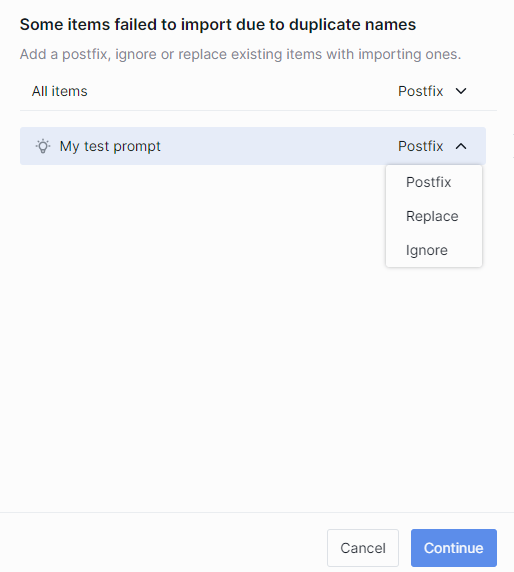
You can export and import prompts.
Note, that when importing a duplicate of an existing prompt, you will be prompted to select one of the proceeding options: replace, ignore or add a prefix to the imported prompt.
Chat Settings
In the Chat Settings section, there are the following components:
- Talk To
- System Prompt
- Temperature
- Addons
Take a closer look at each of these elements.
Talk To
In this section, you can choose the language model for communication, as well as an Assistant or Application to implement specific behavior for the LLM.
Language Models
- In the Talk to area, click See full list... to display all the available models, applications and assistants.
- All tabs (Models, Applications and Assistants) are enabled by default. To display just Models, disable the rest and keep the Models tab active.
- To select a model: click any of the available models or select its version in the dropdown list. The selected model will appear in the models list as pre-selected for the new conversation.
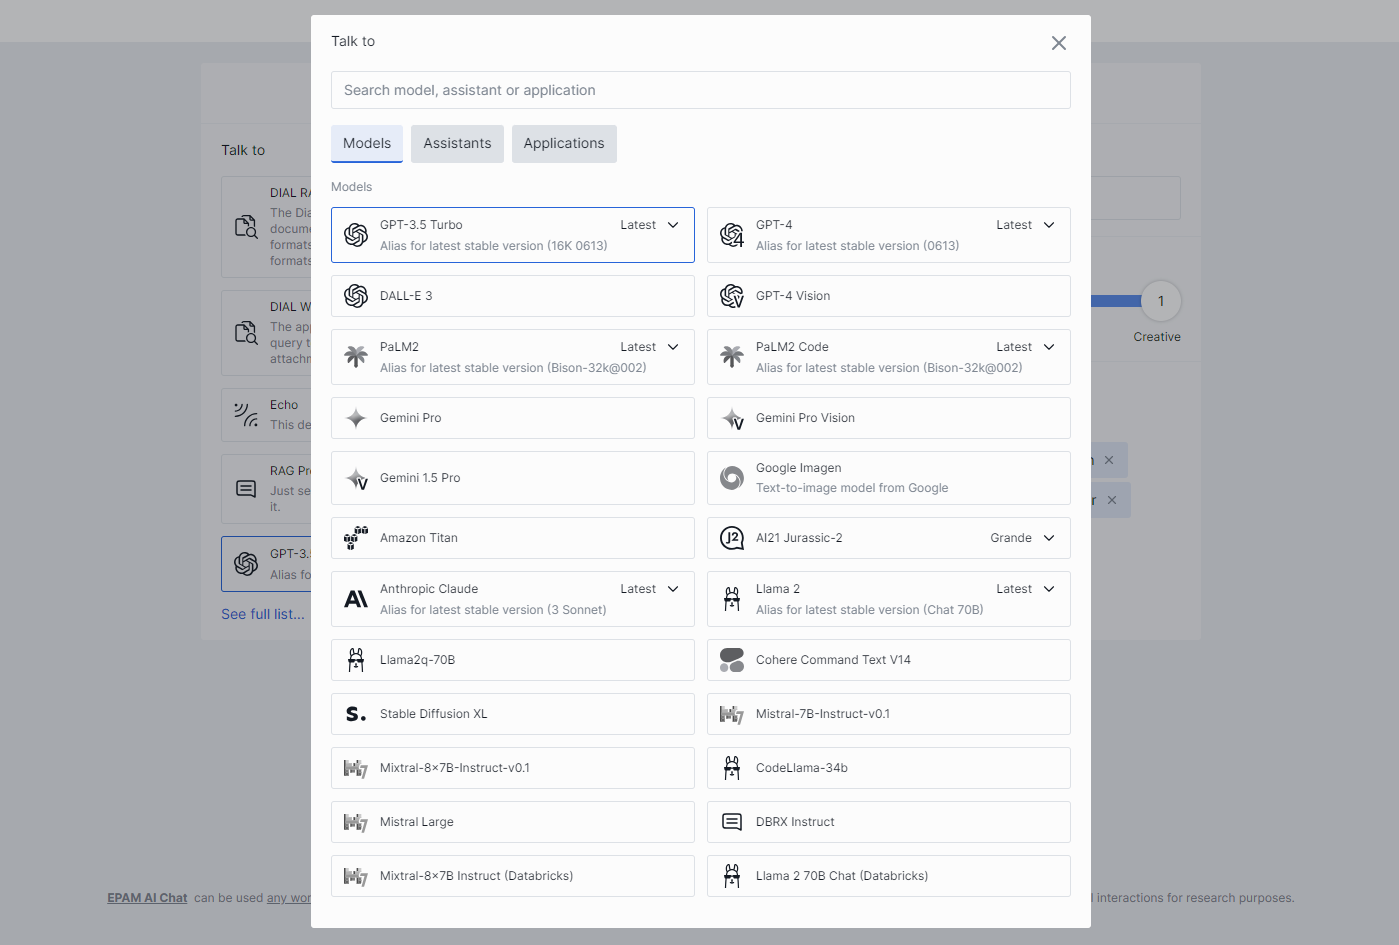
Available language models:
- GPT-3.5 is an advanced language model developed by OpenAI, known for its powerful natural language processing, understanding, and context awareness. Enabling human-like conversations, it can carry out various tasks, including summarizing, translation, content creation, and answering queries.
- GPT-4 is the latest iteration of the GTP series by OpenAI, offering more powerful natural language processing capabilities than its previous versions. It harnesses extensive training and massive datasets to deliver lifelike conversations, unsurpassed context awareness, and high-quality content generation across multiple languages and domains.
- GPT-4-32K is the extension for GTP-4 that can possess a larger context window size (32,000 tokens). It offers several advantages, including a better understanding of context, improved performance in long-form tasks, enhanced reasoning and knowledge handling, and increased creativity in content generation. Please only use this one if you absolutely need it. It's slower and more expensive.
- PaLM2 (Bison) is an LLM developed by Google that leverages an innovative hierarchical architecture to enhance its linguistic competence and computational efficiency. By employing parallel and multitask learning mechanisms, PaLM2 (Bison) provides exceptional performance in diverse language tasks, like question-answering, summarization, and translation, while also being highly scalable and adaptive to new environments.
- AI21 (Jurassic-2 Grande) is a large-scale language model with 178 billion parameters developed by AI21 Labs. It is an upgraded version of its predecessor AI21 Jurassic-1 and is capable of processing extensive amounts of text and generating contextually appropriate replies. The model's distinguishing features include its scale, contextual understanding, multilingualism, few-shot learning, and knowledge integration with external sources. It is designed to enhance natural language processing, chatbots, virtual assistants, and other applications requiring advanced language capabilities.
- AI21 (Jurassic-2 Jumbo) is an expansion of the AI21 Jurassic-2 Grande model, leveraging improved training techniques, larger datasets, and advanced hardware resources. Jumbo provides a boost in performance and is specifically designed for challenging natural language applications such as sentiment analysis, language translation, and document summarization. AI21 Jurassic-2 Jumbo has 199 billion parameters, making it the largest publicly available language model to date.
- CodeLlama-34b is a language model developed by Meta that has 34 billion parameters. CodeLlama-34b is specifically designed for use in software development and is trained on a diverse set of technical documentation, including programming languages, code samples, and developer forums. The model is optimized for code-related natural language queries, including code completion, code understanding, and code generation.
- Llama2q-70B is an LLM developed by Meta, which has 70 billion parameters. Like CodeLlama-34b, it is designed for technical applications but with a broader scope. Llama2q-70B has a wide range of capabilities, including question answering, text classification, and summarization. It is trained on a variety of sources, including technical documents, academic papers, and news articles, and is designed to provide accurate results for a wide range of technical queries and applications.
- Anthropic (Claude) is a large-scale LLM with 175 billion parameters that is optimized for general-purpose language tasks, including question answering, dialogue generation, and text completion. The model has been trained on data from a wide range of sources to provide high accuracy in many contexts.
- Anthropic (Claude Instant) is an LLM that can generate responses in real-time, making it useful for applications such as chatbots and virtual assistants. It is a smaller model than the Anthropic (Claude) model, with 9 billion parameters, and is optimized for low-latency inference.
- Anthropic (Claude V2) is an upgraded version of the Anthropic (Claude) model, with 400 billion parameters, making it one of the largest language models to date. This model is designed for sophisticated NLP applications involving complex reasoning, inference, and understanding of long-form text data.
- AWS (Titan): AWS (Amazon Web Services) developed an LLM called Titan in 2021, which has 850 billion parameters, making it the largest publicly available language model at the time of its introduction. The model was trained on a diverse set of text sources, including web pages, books, and news articles. Titan is designed to handle complex natural language processing tasks, such as summarization, dialogue generation, and translation.
Assistants
- In the Talk to area, click See full list... to display all the available models, applications and assistants.
- All tabs (Models, Applications and Assistants) are enabled by default. To display just Assistants, disable the rest and keep the Assistants tab active.
- Click any of the available assistants to start a conversation.
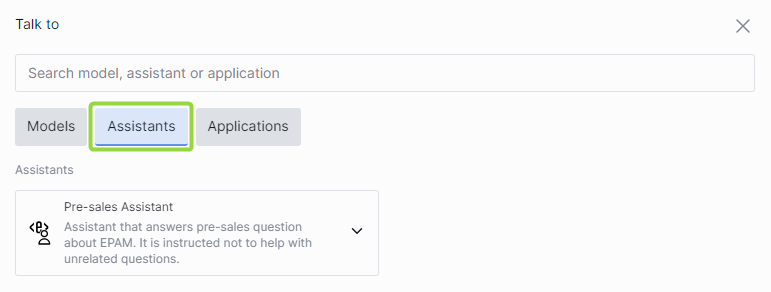
In the AI DIAL framework, Assistants are a combination of preselected Addons and System Prompts that enable specific behavior in the LLM, allowing for more tailored and adaptive responses to user needs. Unlike the Model+Addon configuration, where users have the flexibility to choose different Addons, Assistants come with predetermined Addons that cannot be removed or unselected. However, the Model can still be reassigned within the Assistant.
Assistants give you more control over LLM behavior, resulting in tailored and accurate responses that match specific needs. The flexibility of this combination lets you create custom Assistants within the AI DIAL framework. These Assistants can range from simple tasks, like asking the LLM to provide answers in a specific tone or style (e.g., like a pirate), to more complex tasks, such as restricting the LLM's data to a specific geographical area (e.g., providing weather forecasts for Chicago only). Combining Addons and System Prompts enables better customization and adaptability to various situations, leading to more versatile responses.
In a chat application, you can include custom Assistant(s) that users can choose when using AI DIAL.
Applications
- In the Talk to area, click See full list... to display all the available models, applications and assistants.
- All tabs (Models, Applications and Assistants) are enabled by default. To display just Applications, disable the rest and keep the Applications tab active.
- Click any of the available applications to start a conversation.

In the AI DIAL framework, Applications are ready-to-use solutions made up of predefined configurations of Addons and other services or any custom logic. They help you customize LLM behavior by integrating Addons with any desired logic. Applications can be any component that meets API requirements and implements non-LLM-related logic, such as repeating user messages, creating a fully deterministic chatbot, or managing complex multi-LLM interactions. This versatility in Applications allows for tailored handling of unique scenarios and requirements.
System Prompt
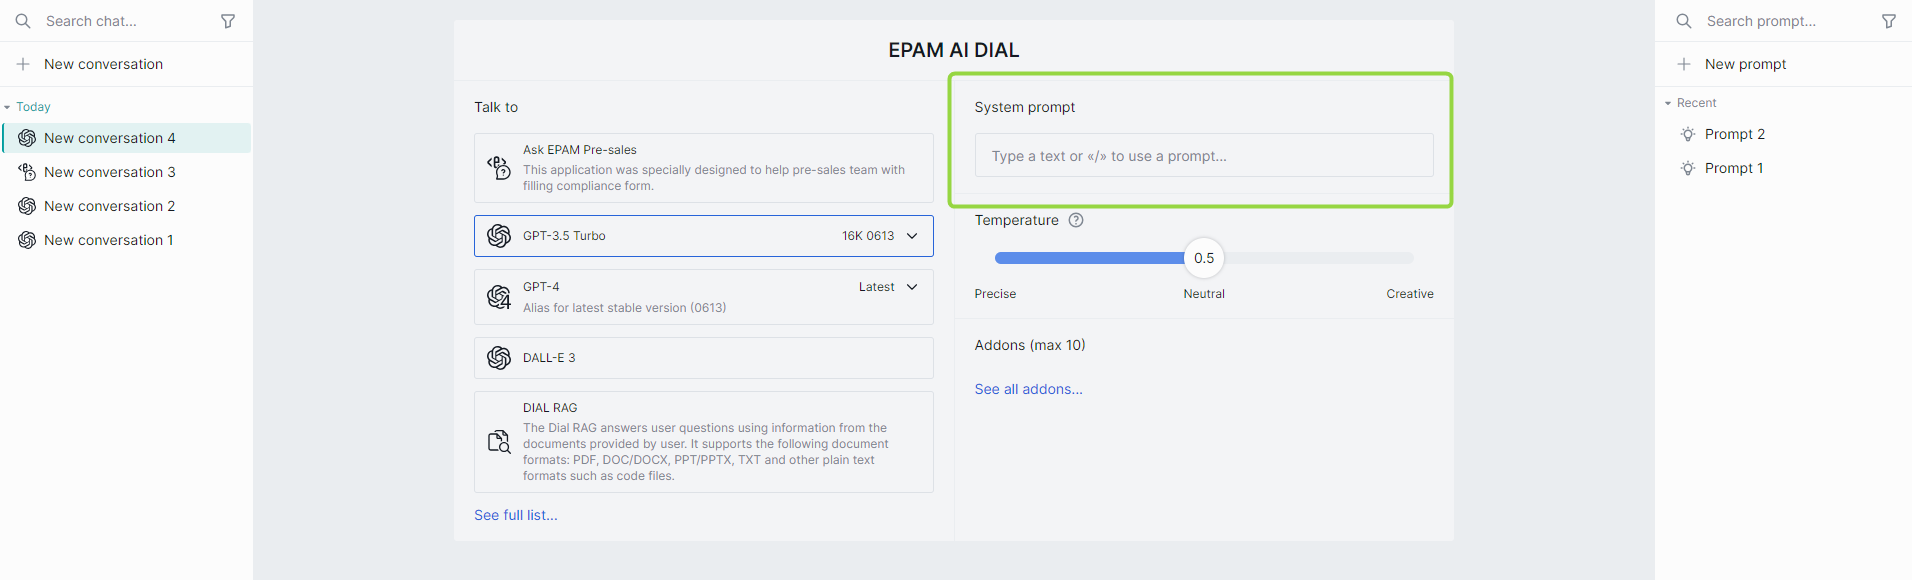
The system prompt in AI DIAL refers to the initial instructions given to the model. You can use any previously created prompt as a system prompt (for details, refer to the Create in Prompts), and it will set the context and tone for the whole conversation.
The system prompt in AI DIAL is like a compass for a traveler, pointing the model in the right direction to navigate the conversational landscape, ensuring it stays on course and aligned with the overall purpose and desired outcome.
You can change system prompts during a conversation by selecting the Settings icon at the top bar of the conversation.
Example
Let’s compare a conversation with a system prompt selected and a conversation without a system prompt. For illustration purposes, we’re going to use the compare mode (refer to the Compare section for details) and create two conversations with identical settings except for the system prompt selection.
The prompt used as a system prompt is as follows:
Let's play a game. Name a city that starts with the last letter of the one that I named in a previous message and then tell me that it is my turn to name a city.

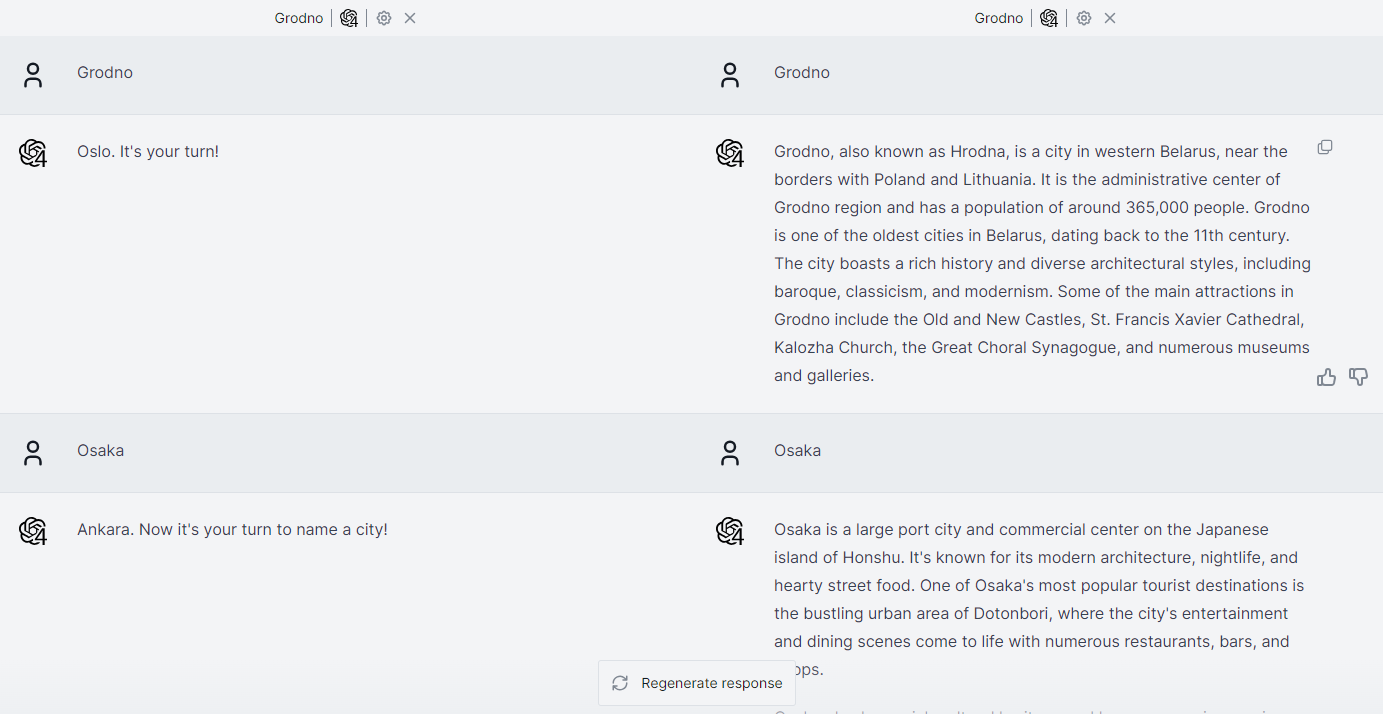
| User message | Language model response without a system prompt | Language model response with a system prompt |
|---|---|---|
| Grodno | Grodno, also known as Hrodna, is a city in western Belarus, near the borders with Poland and Lithuania. It is the administrative center of Grodno region and has a population of around 365,000 people. Grodno is one of the oldest cities in Belarus, dating back to the 11th century. The city boasts a rich history and diverse architectural styles, including baroque, classicism, and modernism. | Oslo. It's your turn! |
| Osaka | Osaka is a large port city and commercial center on the Japanese island of Honshu. It's known for its modern architecture, nightlife, and hearty street food. One of Osaka's most popular tourist destinations is the bustling urban area of Dotonbori, where the city's entertainment and dining scenes come to life with numerous restaurants, bars, and shops. | Ankara. Now it's your turn to name a city! |
| Antwerp | Antwerp is a city in Belgium, and it's the country’s biggest port. It is located on the River Scheldt, linked to the North Sea by the Westerschelde estuary. Known for its many historical buildings, squares, museums, and cultural attractions, it's a popular tourist destination. | Prague. Your turn to name a city! |
Temperature
The temperature parameter controls the creativity and randomness of the model's output. A higher temperature (e.g., 1.0) makes the output more diverse and creative, while a lower temperature (e.g., 0.1) makes the output more focused and deterministic.
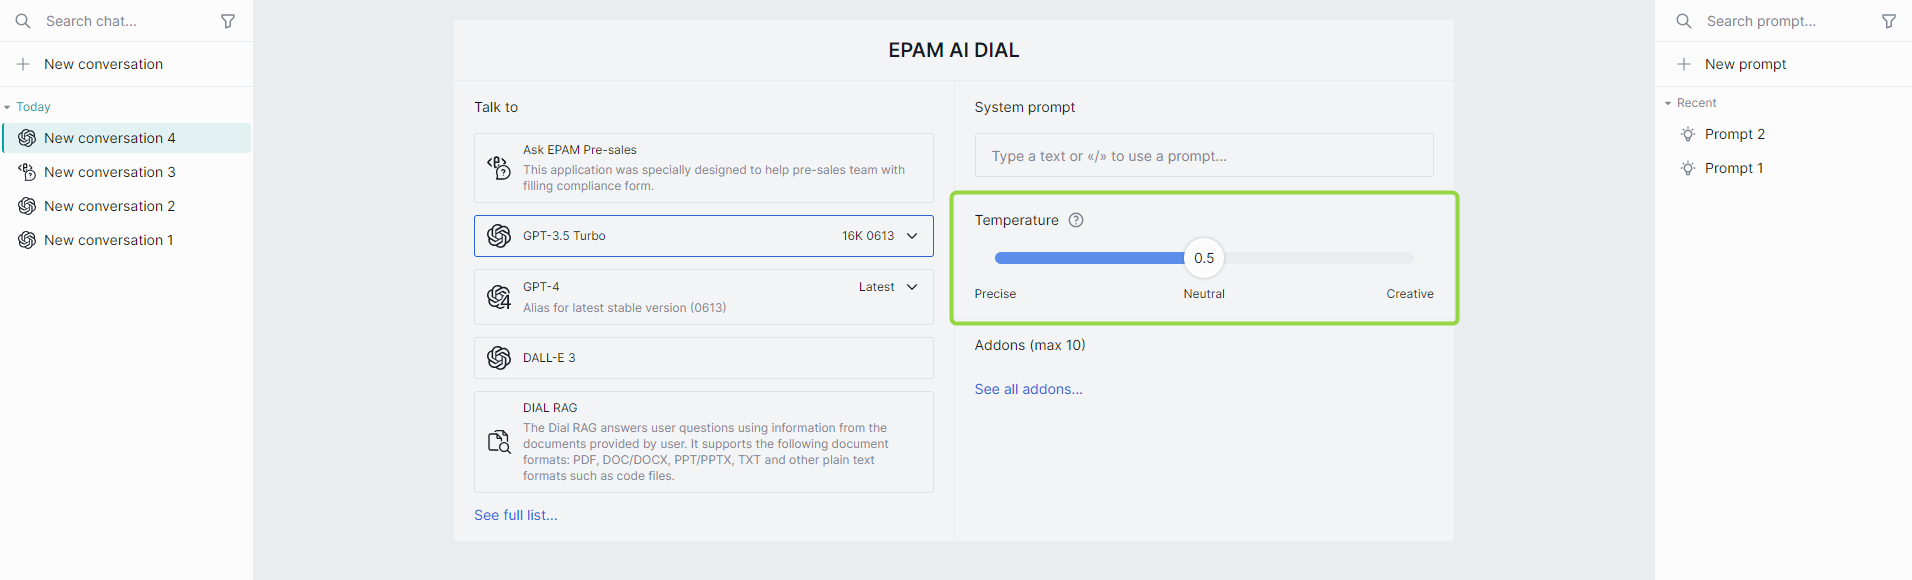
Adjusting the temperature allows you to balance creativity and consistency in the generated response.
Addons
You may want LLM to access particular data or technology to generate responses. This could be your company's database, a collection of PDF documents, calculation engines, API or any other data source or technology. Within the AI DIAL framework, an Addon is a service or any component that follows the Open API specification. Some examples of Addon implementation are semantic search, Q&A search, DB query generator, or any other custom logic that meets your business needs. AI DIAL can include custom Addons that you can choose to activate a specific system behavior.
- In the Talk to area, click See all addons... to display all the available addons.
- Select one or several addons and click Apply addons.

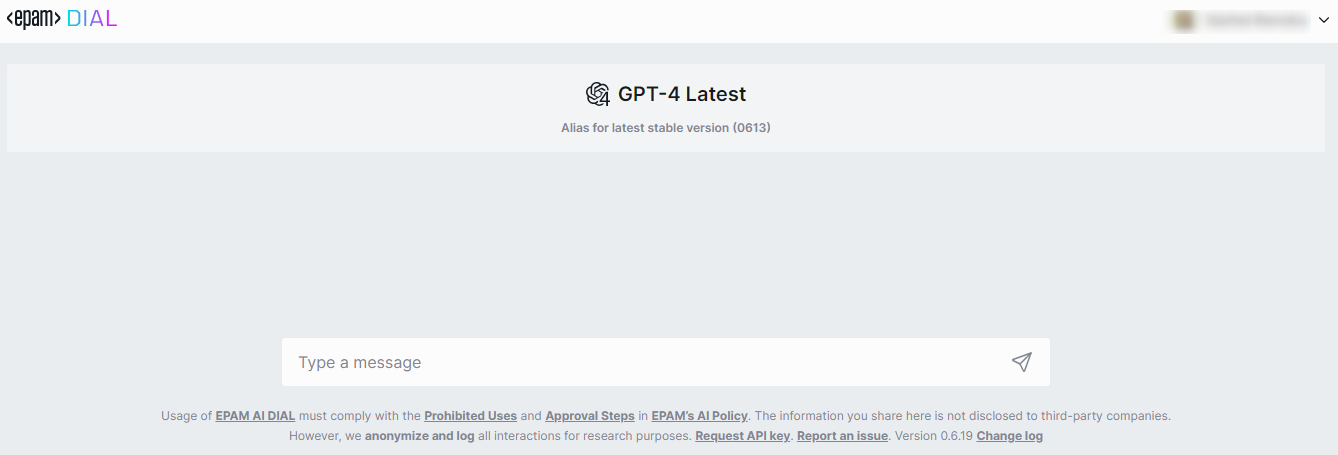
Isolated View Mode
In the Isolated View Mode, a user can follow a specific URL https://server/models/modelID or https://server/models/applicationID to use the AI DIAL Chat in a simplified view with minimal configuration settings for a selected model or application. Conversation settings, conversation and prompt panels are not shown in this case. All created conversations are saved and displayed in the regular chat view mode as well (when just created, names of such conversations are appended in the regular view mode with an isolated prefix in the beginning. e.g. isolated_dial-rag).
For instance, if a user wants to open GPT-4 without any extra features or configurations, they can simply go to https://AI DIAL Chat URL/models/gpt-4 and access a streamlined user interface that only contains a chat input with GPT-4:
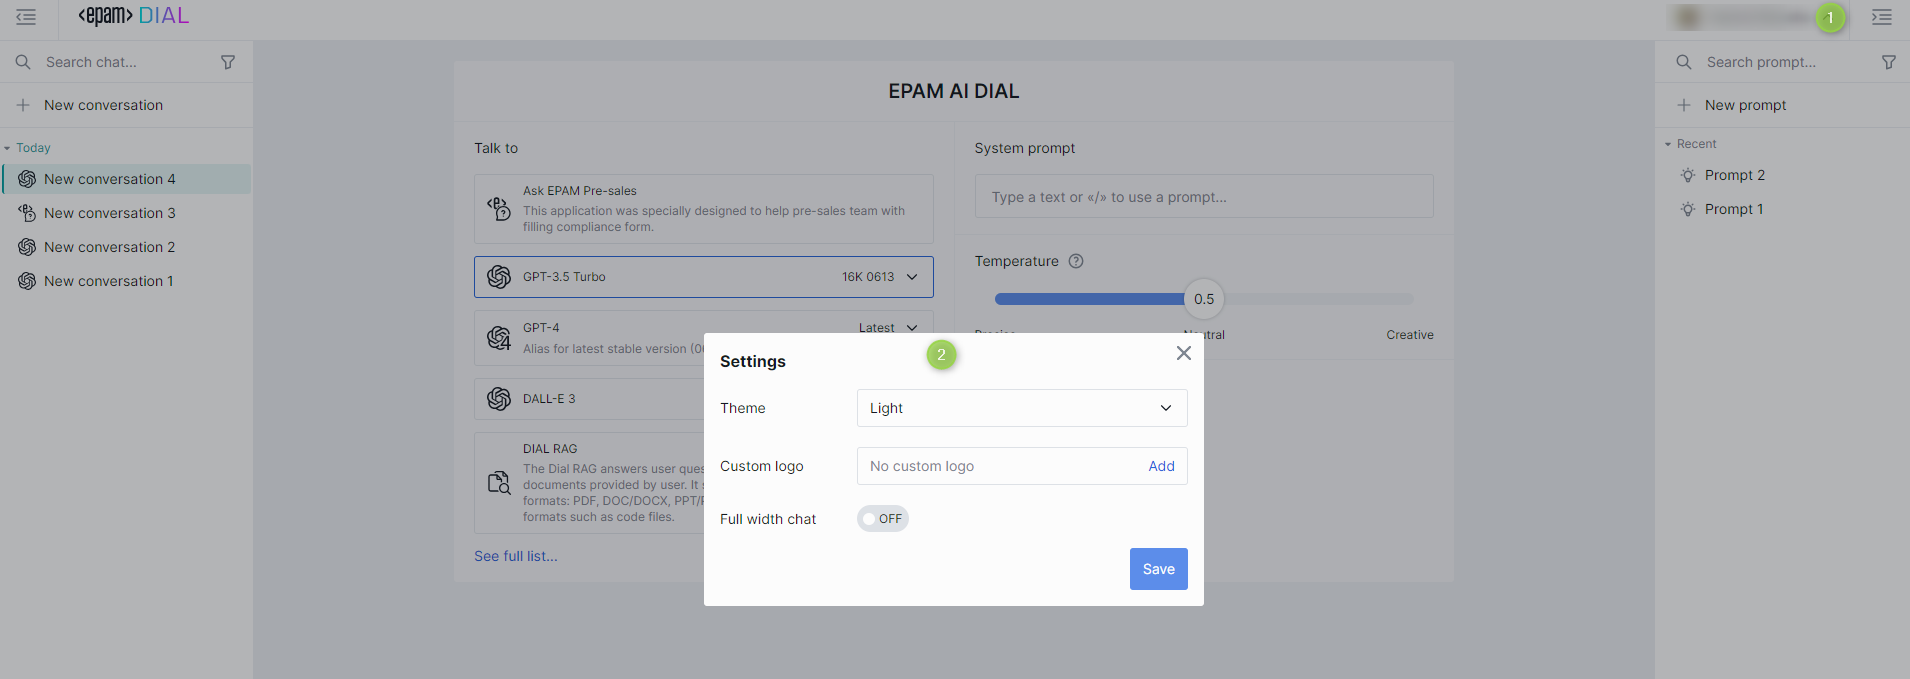
User Settings
On the top bar, in the user area, you can click a down arrow to access additional settings or logout.
You can select the chat theme, dark or light, add a custom logo, and switch on a full width chat mode.
Data Visualization
AI DIAL Chat enables data visualization for specific data types using data visualizers. It comes with built-in support for the Plotly data visualizer. To link any other custom visualizers, you can use the DIAL Chat Visualizer Connector library.
Plotly
Plotly is an open-source JavaScript library that enables the creation of diverse data visualizations, including charts, 3D graphs, and more.
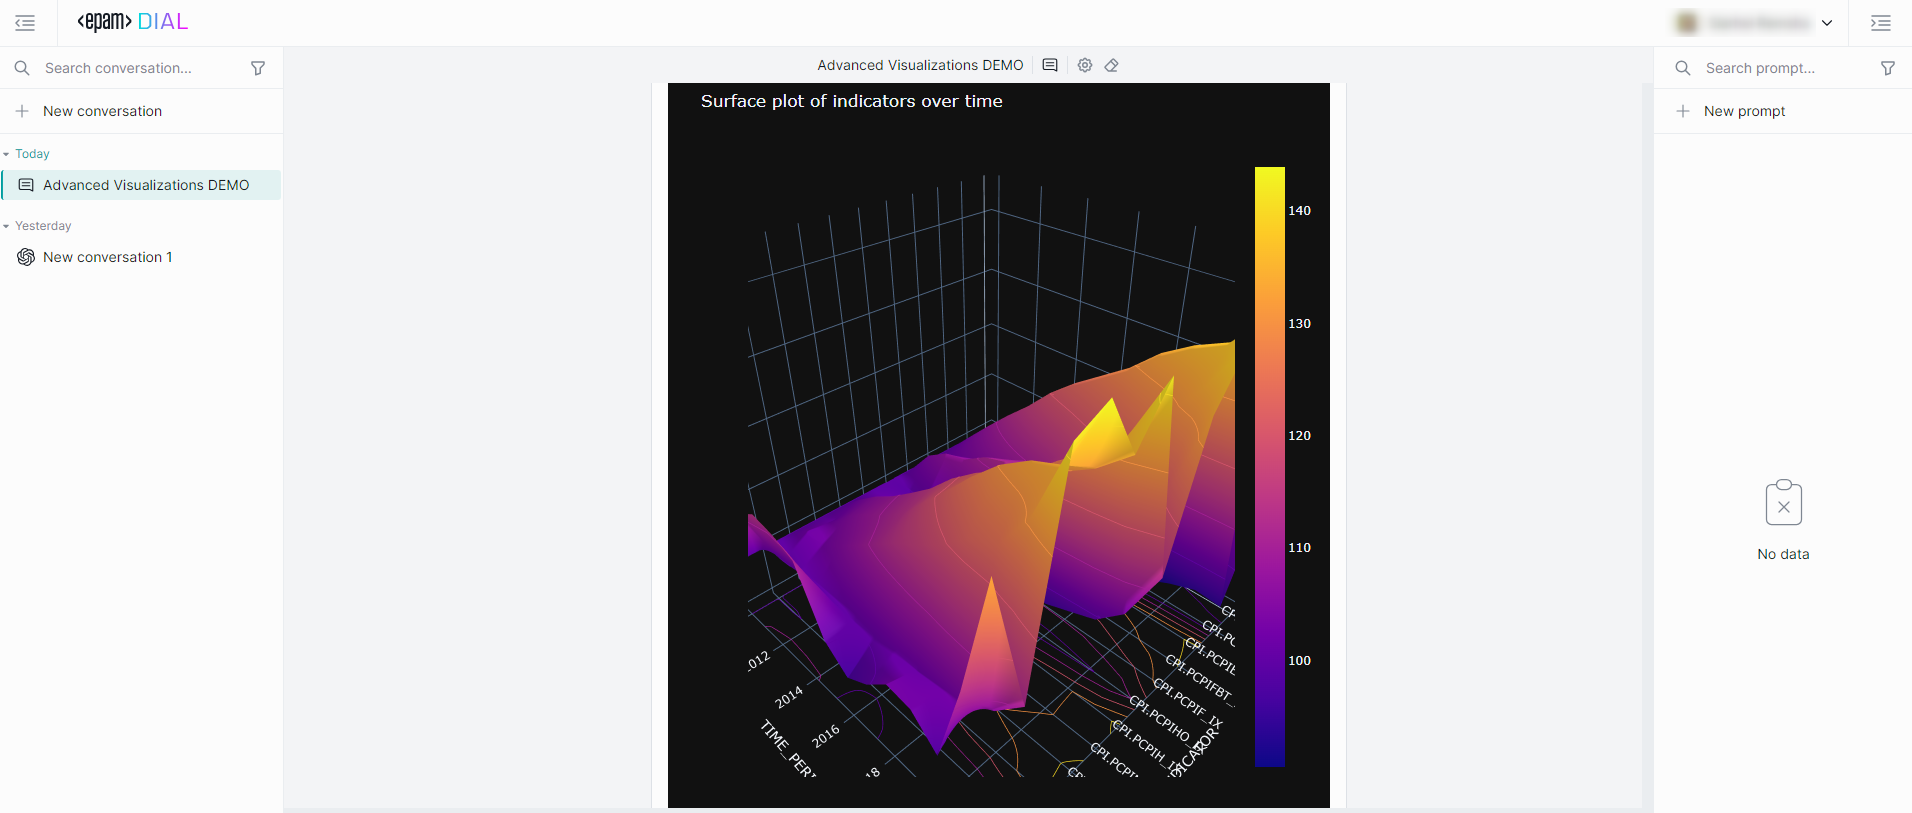
Refer to Plotly to learn more.
AI DIAL Chat integrates with Plotly, offering robust data visualization capabilities. To utilize Plotly, choose an AI DIAL application that supports this feature. These applications must be capable of querying data (either from a URL or directly from the Chat application) based on user input and returning it in a format compatible with Plotly. Chat automatically detects attachments in this format and uses Plotly to visualize the data.
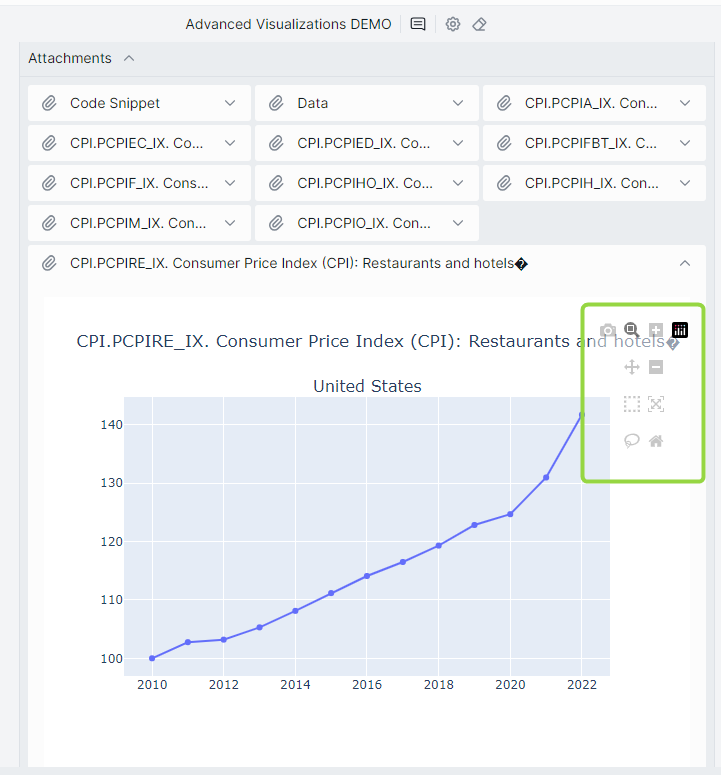
The visualizations come with standard Plotly controls for easy manipulation.
Refer to Plotly GitHub to learn more.
Tables
AI DIAL Chat supports rendering of tables and copying table data in various formats out-of-the-box.

As displayed on the illustration, you can ask a model to create a simple table. When created, you can pick one of three formats to copy its data: CSV, Markdow or Text.